Streamlining ticket management is crucial for smooth business operations. Custom tags are the game-changer here, transforming how tickets are organized and prioritized. Join us in this guide as we dive deep into harnessing the power of custom tags to boost efficiency and clarity in your ticketing system.
Here is a step by step guide to tag your tickets.
Accessing the Tag Creation Section
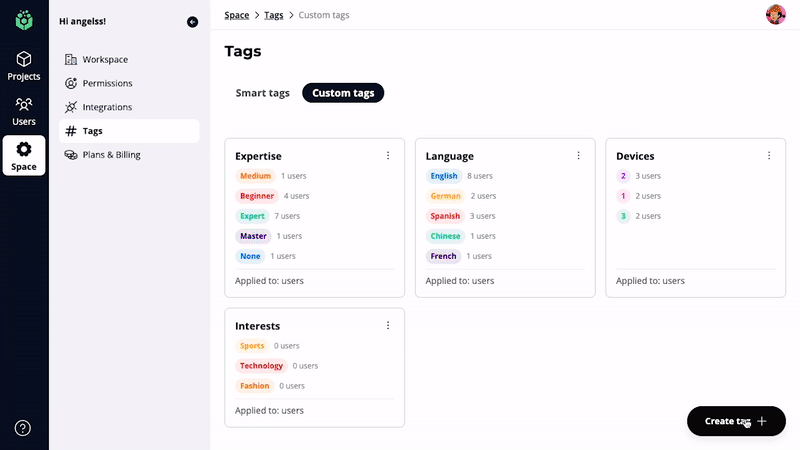
Log in to your Stomio manager account and navigate to Space > Tags. You will find two different tabs: Smart tags and Custom tags. Smarts tags are automatically assigned to your users and Custom tags are your personalized ones. Navigate to Custom Tags.
Creating Tag Categories
Look for the option to create tag categories in the bottom right corner.
Click on Create Tag + a popup must appear.
Defining Tag Categories
Name your tag category descriptively, such as "Severity," "Priority," "Effort," etc.
Determine the types of tags you want within this category. For instance, if it's "Priority," tags could be "High," "Medium," and "Low”.
Tags can be applied in 2 sections of the app, users and tickets. For this time we want to categorize just tickets.
Click Done to finish the process.
Assigning Tags to Tickets
Access the Users table under principal left navigation.
Locate the user you want to assign tags to and select or multi-select the ones applying.
Usage of tags
Organize your work: Tags act as visual cues, simplifying sorting and filtering processes, ultimately enhancing productivity by enabling precise allocation of resources and prompt resolution of diverse ticket-related challenges.
Troubleshooting and Assistance: When creating tag categories, multi-select Users and Tickets. Assigning tags to users will automatically surface in their created tickets, providing valuable context for more effective assistance.
Priority level: Tags like "High Priority," "Urgent," or "Low Priority" help immediately identify the urgency of a ticket
Department: Tags specifying departments or teams like "Marketing," "Sales," or "IT Support" to route tickets to the right group for faster resolution.
Custom status tracking: Stomio offers you 2 status “Open” and “Close” but you can always create your own for more personalization.
Feedback type: Tags like "Positive Feedback," "Negative Feedback," or "Feature Suggestion" help in identifying tickets related to customer opinions or suggestions.
Got a question or suggestion? Reach out to us: hello@stomio.io